0. 前言·
本实验为MIT6.s8081的第九个实验,主题和 文件系统 相关。实验任务有两个:
- 增大xv6的最大文件size限制
- 实现软链接
整体来看,实验相对简单。
1. 实现·
1. Large files·
本任务要求增大xv6的最大文件size限制。
原文要求:
In this assignment you’ll increase the maximum size of an xv6 file. Currently xv6 files are limited to 268 blocks, or 268*BSIZE bytes (BSIZE is 1024 in xv6). This limit comes from the fact that an xv6 inode contains 12 “direct” block numbers and one “singly-indirect” block number, which refers to a block that holds up to 256 more block numbers, for a total of 12+256=268 blocks.
The
bigfilecommand creates the longest file it can, and reports that size:
2
3
4
5
..
wrote 268 blocks
bigfile: file is too small
$The test fails because
bigfileexpects to be able to create a file with 65803 blocks, but unmodified xv6 limits files to 268 blocks.You’ll change the xv6 file system code to support a “doubly-indirect” block in each inode, containing 256 addresses of singly-indirect blocks, each of which can contain up to 256 addresses of data blocks. The result will be that a file will be able to consist of up to 65803 blocks, or 256*256+256+11 blocks (11 instead of 12, because we will sacrifice one of the direct block numbers for the double-indirect block).
Preliminaries·
The
mkfsprogram creates the xv6 file system disk image and determines how many total blocks the file system has; this size is controlled byFSSIZEinkernel/param.h. You’ll see thatFSSIZEin the repository for this lab is set to 200,000 blocks. You should see the following output frommkfs/mkfsin the make output:
This line describes the file system that
mkfs/mkfsbuilt: it has 70 meta-data blocks (blocks used to describe the file system) and 199,930 data blocks, totaling 200,000 blocks. If at any point during the lab you find yourself having to rebuild the file system from scratch, you can runmake cleanwhich forces make to rebuild fs.img.What to Look At·
The format of an on-disk inode is defined by
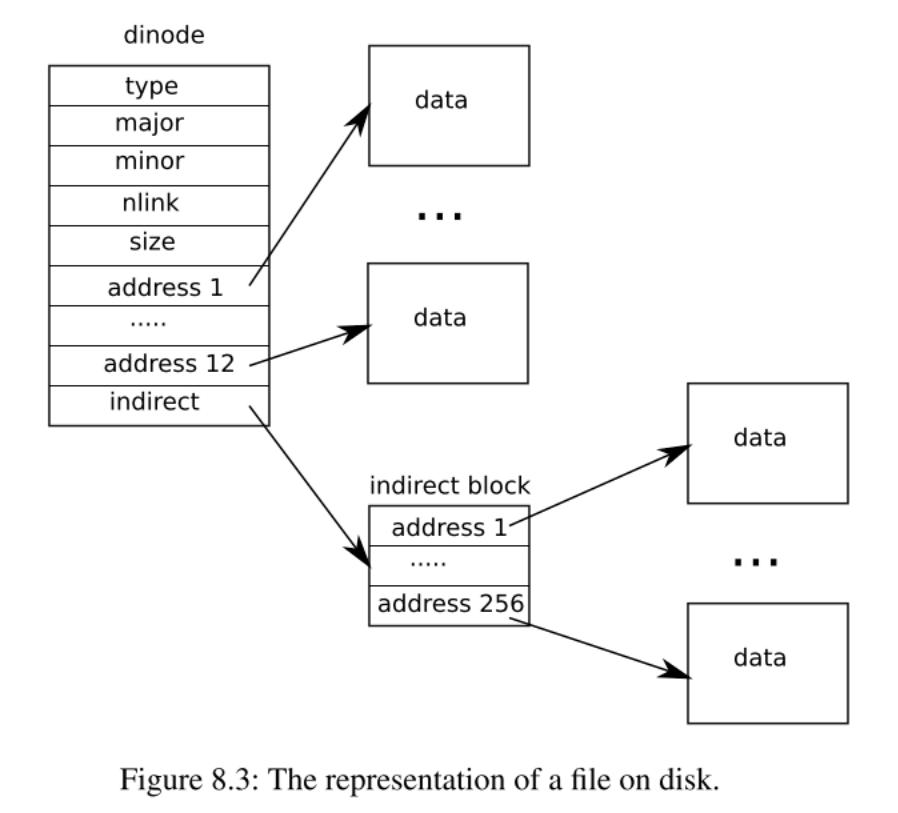
struct dinodeinfs.h. You’re particularly interested inNDIRECT,NINDIRECT,MAXFILE, and theaddrs[]element ofstruct dinode. Look at Figure 8.3 in the xv6 text for a diagram of the standard xv6 inode.The code that finds a file’s data on disk is in
bmap()infs.c. Have a look at it and make sure you understand what it’s doing.bmap()is called both when reading and writing a file. When writing,bmap()allocates new blocks as needed to hold file content, as well as allocating an indirect block if needed to hold block addresses.
bmap()deals with two kinds of block numbers. Thebnargument is a “logical block number” – a block number within the file, relative to the start of the file. The block numbers inip->addrs[], and the argument tobread(), are disk block numbers. You can viewbmap()as mapping a file’s logical block numbers into disk block numbers.Your Job·
Modify
bmap()so that it implements a doubly-indirect block, in addition to direct blocks and a singly-indirect block. You’ll have to have only 11 direct blocks, rather than 12, to make room for your new doubly-indirect block; you’re not allowed to change the size of an on-disk inode. The first 11 elements ofip->addrs[]should be direct blocks; the 12th should be a singly-indirect block (just like the current one); the 13th should be your new doubly-indirect block. You are done with this exercise whenbigfilewrites 65803 blocks andusertestsruns successfully:
2
3
4
5
6
7
8
..................................................................................................................................................................................................................................................................................................................................................................................................................................................................................................................................................................................................................................................................................
wrote 65803 blocks
done; ok
$ usertests
...
ALL TESTS PASSED
$
bigfilewill take at least a minute and a half to run.
1. 原理·
为了完成本实验,首先需要理解xv6文件系统是如何索引data block的。下图展示了xv6原版的inode:

xv6中,有12个直接寻址地址和一个间接寻址地址。所以最多能支持的data block个数为: 12 + 256=268个。由于xv6中,每个data block的大小为1KB, 所以xv6最大文件大小为268K。
所以,为了扩大单文件最大大小阈值,需要增加一个二级间接索引地址(类似二级页表)。
2. 实现·
增加二级间接索引宏:
1 |
修改inode和dinode:
1 | uint addrs[NDIRECT + 1 + 1]; // NDIRECT direct block, 1 indirect block, 1 doubly indirect blocks |
接着修改bmap函数, bmap为data block的索引逻辑函数,完成file的逻辑块到物理块的映射。
1 | // current layout: |
最后,完善data block的释放逻辑函数 itrunc:
1 | // Truncate inode (discard contents). |
至此,task 1完成。 执行 bigfile进行测试。
2. Symbolic links·
本任务要求实现软链接功能,原文要求如下:
In this exercise you will add symbolic links to xv6. Symbolic links (or soft links) refer to a linked file by pathname; when a symbolic link is opened, the kernel follows the link to the referred file. Symbolic links resembles hard links, but hard links are restricted to pointing to file on the same disk, while symbolic links can cross disk devices. Although xv6 doesn’t support multiple devices, implementing this system call is a good exercise to understand how pathname lookup works.
Your job·
You will implement the
symlink(char *target, char *path)system call, which creates a new symbolic link at path that refers to file named by target. For further information, see the man page symlink. To test, add symlinktest to the Makefile and run it. Your solution is complete when the tests produce the following output (including usertests succeeding).
2
3
4
5
6
7
8
9
Start: test symlinks
test symlinks: ok
Start: test concurrent symlinks
test concurrent symlinks: ok
$ usertests
...
ALL TESTS PASSED
$
1. 原理·
软链接本质上就是一个文件,文件内容存放的是被链接的文件的文件路径。打开软链接时,可根据该路径定位到被链接的文件。
2. 实现·
首先需要实现 symlink 系统调用,此部分算是轻车熟路了。略过。主要记录下如何实现该系统调用:
1 | uint64 |
这部分很简单,创建一个软链接文件,并写入 target文件路径。值得注意的是,这里无需判定 target对应文件存在。
另外,修改 sys_open系统调用,增加对软链接文件的处理:
1 | if(omode & O_CREATE){ |
如果是软链接,且mode表示需要FOLLOW该软链接,则调用follow_symlink函数:
1 | // follow the symlink recursively until finding a non-symlink file |
follow_symlink为递归函数,如果follow的过程中,发现被链接的文件又是软链接文件,则继续follow,为了避免形成环形follow,增加了递归次数限制。如果递归超过10次,则取消寻找。(实际上更好的做法,可以采用一个hash table来记录已经遍历过的inode,如果遇到了遍历过的inode,则说明出现了环,进而退出).
另外一个需要注意的是,这里的加解锁。 follow_symlink 要求传入的 ip是持有lock的,而返回的找到的inode_pointer也是持有锁的。中间为了避免死锁问题,在往下一级别递归前,需要释放ip的lock。
至此,完成本实验。执行 symlintest 检测是否通过。
最后还需要执行 usertests判定是否影响了OS的其他功能。
2. 总结·
本实验相对简单,对文件系统的组织有了一个更好的认识。

