0. 前言·
本实验为MIT 6.s081的第七个实验,主题和 多线程 相关。实验任务有三个:
- 实现user level的thread switch
- 完善并发hash table
- 实现一个Barrier,类似Java的CyclicBarrier
1. 原理·
本lab其实无太多原理,task1和task 2、task3无太多联系。
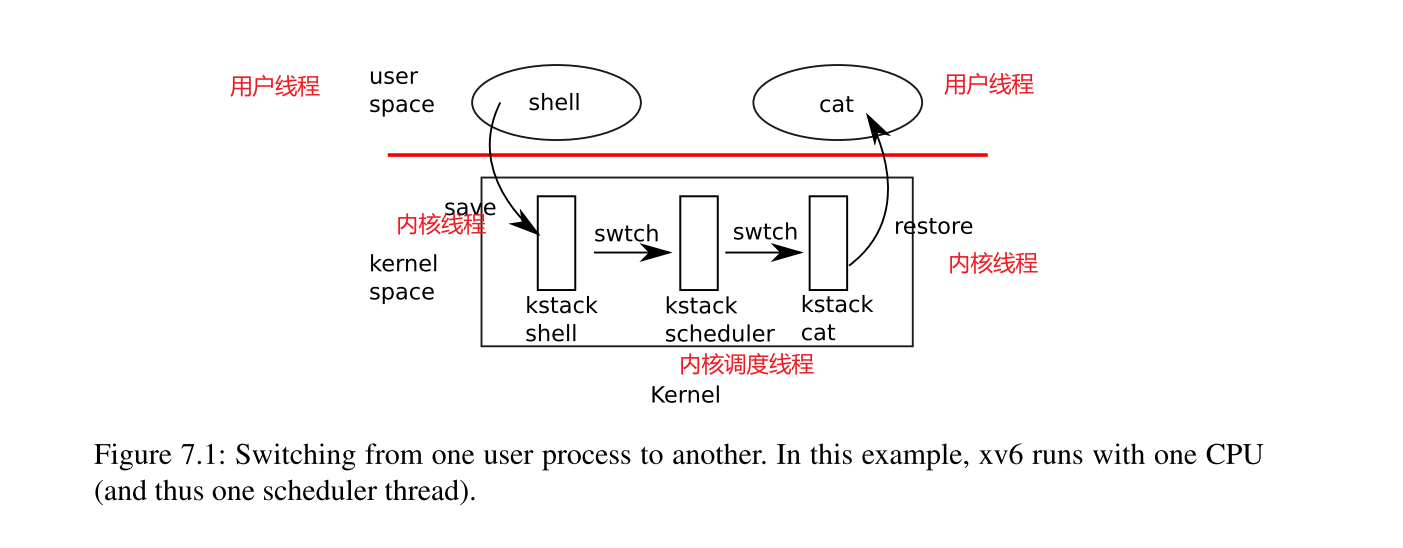
做task 1前,弄懂xv6的线程切换原理即可。下面贴出xv6的线程切换outline:

假设当前shell因为需要等待I/O或者因为定时器中断来临,内核决定切换shell进程到cat进程,则过程大体如下:
- shell进程的用户线程通过trap陷入内核,换该进程的内核线程执行。
- 内核线程通过sleep或者yield,让出当前CPU,内核转换到 内核调度线程。
- 内核调度线程在process array中,选择可被调度的进程,执行切换,来到被调度的进程的内核线程。
- 内核线程通过
usertrapret从内核空间切换到用户空间的用户线程中继续执行。
在xv6中没有进程用户线程直接切换到另一个用户线程的机制,都是通过陷入内核->内核调度->另一个进程的内核线程->来到进程的用户线程这种间接的切换机制。 task 1要求我们实现一个简单的user-level线程切换。
2. 实现·
1. Uthread: switching between threads·
本task的要求如下:
In this exercise you will design the context switch mechanism for a user-level threading system, and then implement it. To get you started, your xv6 has two files user/uthread.c and user/uthread_switch.S, and a rule in the Makefile to build a uthread program. uthread.c contains most of a user-level threading package, and code for three simple test threads. The threading package is missing some of the code to create a thread and to switch between threads.
Your job is to come up with a plan to create threads and save/restore registers to switch between threads, and implement that plan. When you’re done,
make gradeshould say that your solution passes theuthreadtest.
Once you’ve finished, you should see the following output when you run uthread on xv6 (the three threads might start in a different order):
1 | $ make qemu |
This output comes from the three test threads, each of which has a loop that prints a line and then yields the CPU to the other threads.
At this point, however, with no context switch code, you’ll see no output.
You will need to add code to thread_create() and thread_schedule() in user/uthread.c, and thread_switch in user/uthread_switch.S. One goal is ensure that when thread_schedule() runs a given thread for the first time, the thread executes the function passed to thread_create(), on its own stack. Another goal is to ensure that thread_switch saves the registers of the thread being switched away from, restores the registers of the thread being switched to, and returns to the point in the latter thread’s instructions where it last left off. You will have to decide where to save/restore registers; modifying struct thread to hold registers is a good plan. You’ll need to add a call to thread_switch in thread_schedule; you can pass whatever arguments you need to thread_switch, but the intent is to switch from thread t to next_thread.
要求说得很清楚,修改 thread_create , thread_schedule和thread_switch代码,完成线程的创建,线程的切换机制。
首先为thread结构体添加context:
1 | // Saved registers for context switches. |
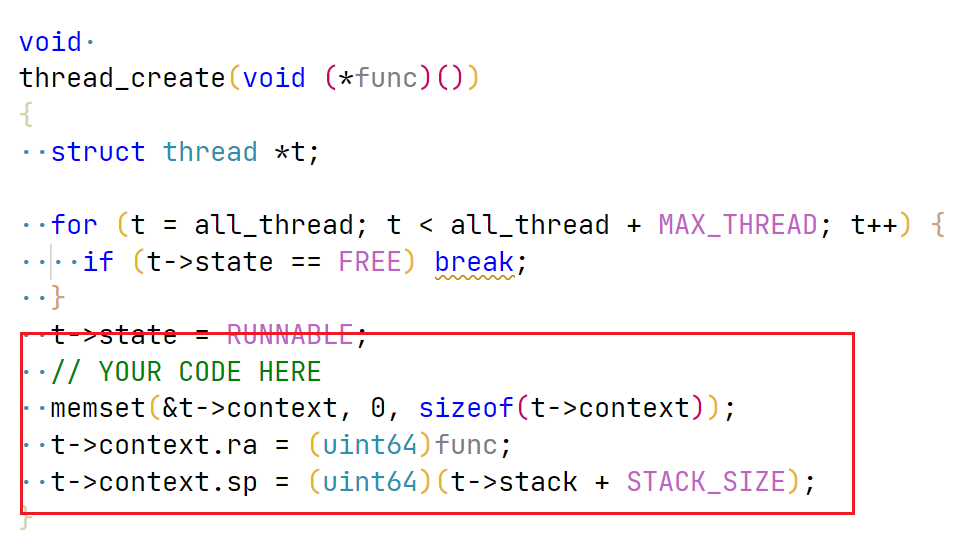
接着修改 thread_create函数:

设置 ra寄存器为 func 函数指针所指向的地址,方便之后线程调度时,调度到 func 处执行。另外设置 thread 自己的执行 stack。 唯一要注意的是,执行stack是从高地址往低地址push,所以 sp = (uint64)(t->stack + STACK_SIZE)
然后修改 thread_schedule 函数:

**最后添加汇编, 其实是copy的kernel thread switch代码, 😉 **
1 | thread_switch: |
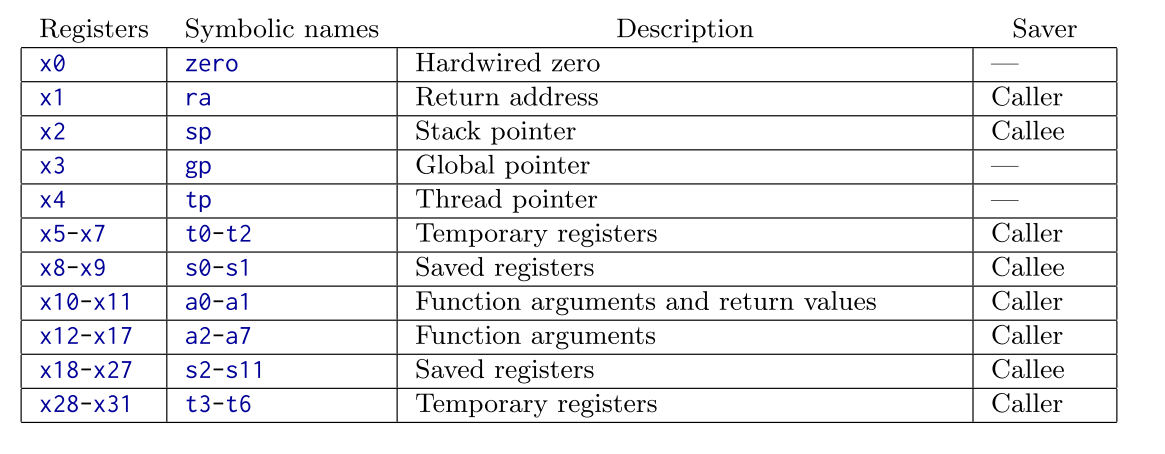
这里的工作为,保存当前thread的context,恢复要调度的thread的context,包括切换 thread stack,设置ra(ret指令会设置当前pc为ra), 一个注意点是,我们只用保存 callee-registers。 这是源于riscv的calling convention,编译器会在caller stack frame上保存caller-register,所以 thread_switch stack frame上只用保存 callee-registers.
caller-registers和callee-registers内容如下:

2. Using threads·
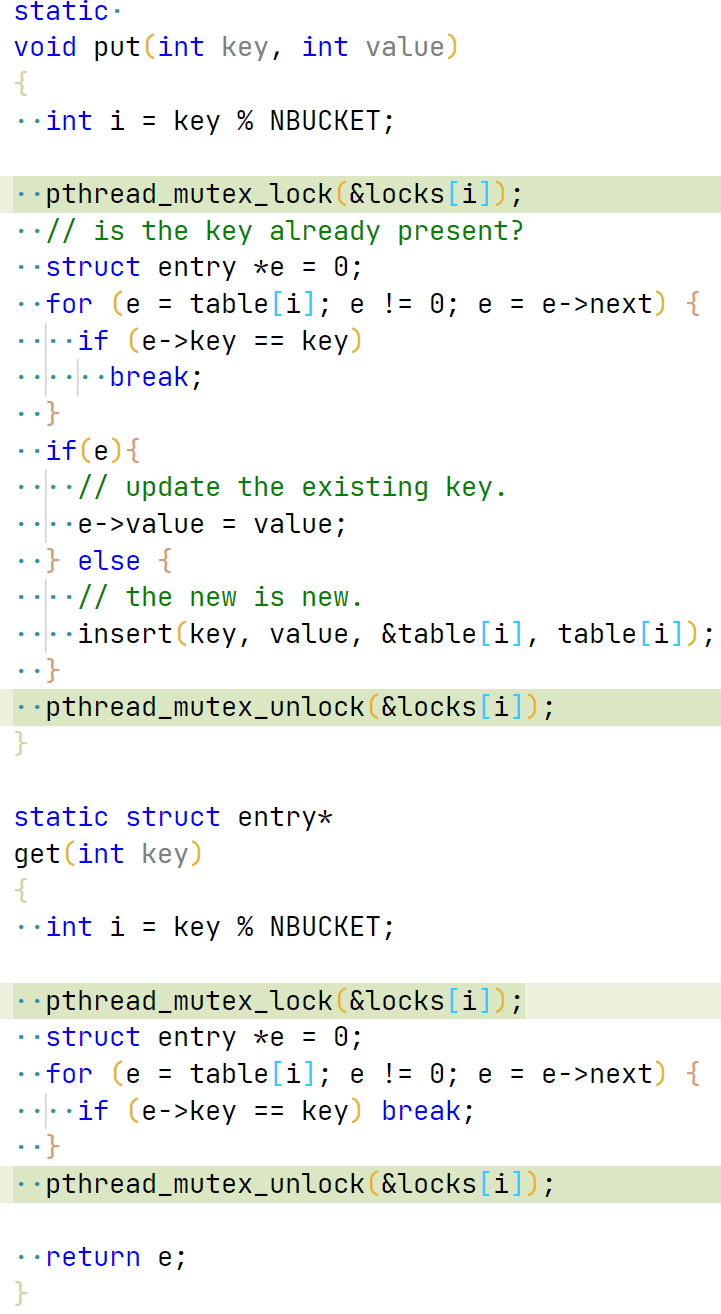
task 2的要求是完成 ph.c 文件,ph.c中实现了一个基础的链式hash table,在单线程下可以正常运行,但是在多线程下存在 data race, 我们的工作是实现 bucket-level的lock,保证 hash table 的并发正确性。
首先为每个BUCKET添加一个lock
1 | pthread_mutex_t locks[NBUCKET]; |
并在main函数中,执行lock的初始化:
1 | // init locks |
最后修改 put和 get函数即可:

3. Barrier·
task 3要求实现一个barrier,对于多线程的程序,当一个线程调用 barrier的实现,需要在barrier处等待所有线程调用 barrier后,再一起往下执行,类似java并发包的 CyclicBarrier.
为实现该功能,需要使用条件变量。代码如下:
1 | static void |
实际上,不添加while循环,也能测试通过,但是个人觉得加上会更保险,因为操作系统是可以唤醒一个在wait的线程的。
3. 总结·
本lab非常简单,没有太多可说的,反倒是本lab对应的lecture,即xv6内核中的线程切换过程,很值得一看。特别是进程加解锁的位置和平常编程中的加解锁位置不同:在一个线程中加锁,在另一个线程中进行解锁,是比较少看见的。

